If you run a membership site on MemberPress, you know the routine. Someone subscribes, upgrades, or cancels, and at some point, you export a user list, clean it up, and re-import it into HubSpot so your sales and marketing lists reflect who is actually a paying member. It takes hours, introduces errors whenever a column shifts, and leaves your CRM out of date the moment the export finishes.
FlowSync removes that step. You build a single workflow that monitors MemberPress, checks which membership product a member is on, and syncs their contact directly to the correct HubSpot list. Once the HubSpot integration is set to bidirectional, changes your team makes in HubSpot can flow back into the WordPress user profile as well. Here is how to set it up.
What you’ll build
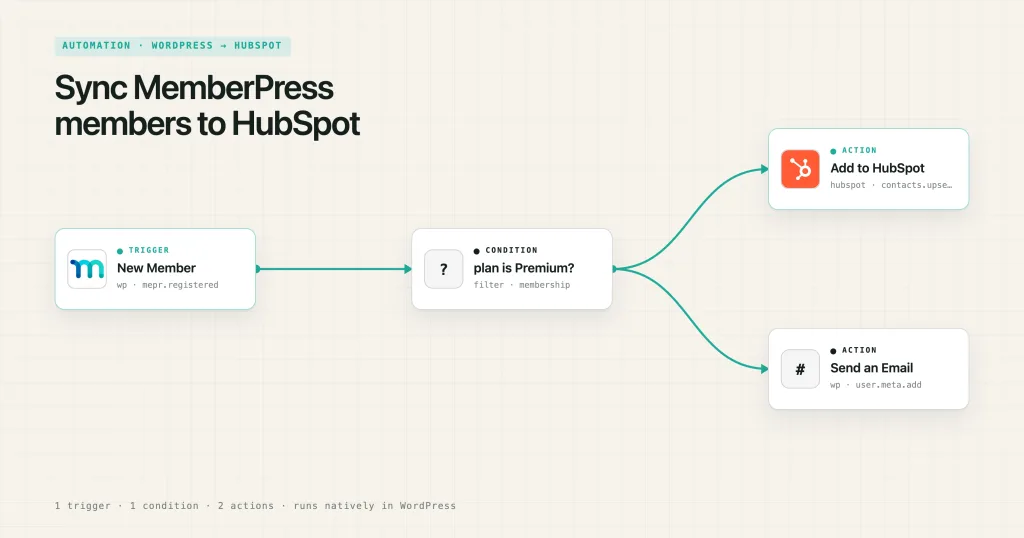
A workflow that fires when a MemberPress membership becomes active, checks the membership product, and syncs the member’s contact details to the matching HubSpot list. You can clone it per product, so free members and paid members land in different lists with different follow-ups.
Step 1: Create a new workflow
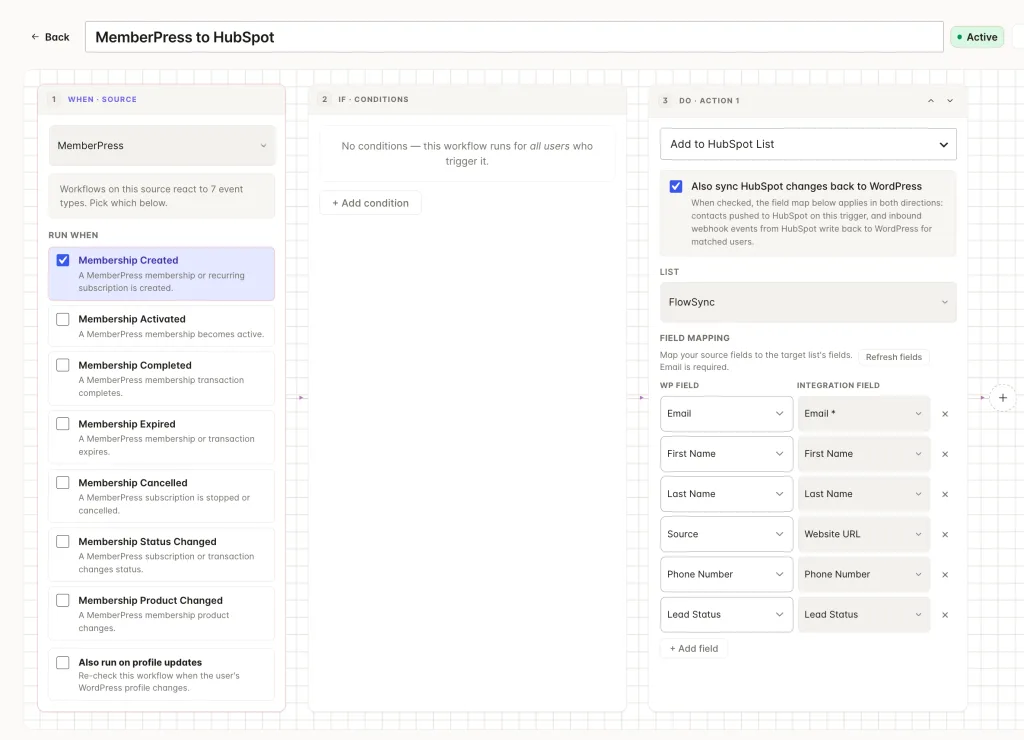
In your WordPress dashboard, go to FlowSync → Workflows and click Add New. Name it something you’ll recognize later, like “MemberPress to HubSpot Sync.”
Step 2: Set the trigger
Under WHEN · SOURCE, select MemberPress. FlowSync lists the membership events it can trigger on:
- Membership Created
- Membership Activated
- Membership Completed
- Membership Expired
- Membership Cancelled
- Membership Status Changed
- Membership Product Changed
Select Membership Activated. A membership can be created in a pending state before payment clears, so triggering on activation rather than creation means the workflow only runs once the member is actually active.
Step 3: Add a condition
Click + Add condition under IF · CONDITIONS and set:
- Field: Membership Product
- Operator: equals
- Value: pick your paid product from the dropdown (for example, “Premium”)
The Membership Product field reads your live MemberPress products and stores the selection as a product ID, not the display name, so renaming the product later won’t break the workflow. This condition is what lets you route each product to its own HubSpot list. Free members and paid members run through separate workflows with separate destinations.
Step 4: Configure the HubSpot action
Under DO · ACTION, select Add to HubSpot List. If you haven’t connected HubSpot yet, click Connect and authorise FlowSync through HubSpot’s OAuth flow. HubSpot uses OAuth rather than an API key, so you approve access in HubSpot and get sent back to FlowSync, with no key to copy or store.
For developers: The OAuth handshake is brokered through
oauth.flowsync.site, so the access and refresh tokens are issued against FlowSync’s registered HubSpot app and stored per site. You don’t register your own HubSpot app or manage scopes.
Pick the target list, then map your fields:
| WordPress field | HubSpot property |
|---|---|
| Email (required) | |
| First Name | First Name |
| Last Name | Last Name |
An email is required because HubSpot identifies a contact by email address. FlowSync looks up the contact by email first and updates it if it exists, so you won’t get duplicates.
Email, First Name, and Last Name map on the free plan. Mapping anything beyond those three, like a Company value, a phone number, or a MemberPress custom field, is part of advanced field mapping in FlowSync Pro. If you only need the name and email synced, the free plan covers the entire workflow.
Step 5: Notify your team (optional)
If you want a heads-up when a new paid member comes through, click the + to add a second action and select Send Email:
- Send to: your site admin email
- Subject: New Premium Member: {{first_name}}
- Body: reference the member with merge tokens such as
{{first_name}}and{{user_email}}
This runs after the HubSpot sync, so the contact is already in your CRM by the time the notification lands.
Step 6: Sync HubSpot changes back to WordPress
By default, the workflow above is one direction: WordPress to HubSpot. If your sales team edits a contact in HubSpot, for example, correcting a phone number or setting a custom property, that change stays in HubSpot. With bidirectional sync, FlowSync can write those changes back into the matching WordPress user profile. This is a Pro feature.
To turn it on, go to FlowSync → Integrations → HubSpot and set Sync direction to Bidirectional. With bidirectional enabled, FlowSync polls HubSpot for contacts that have changed recently and matches each one to a WordPress user by email address.
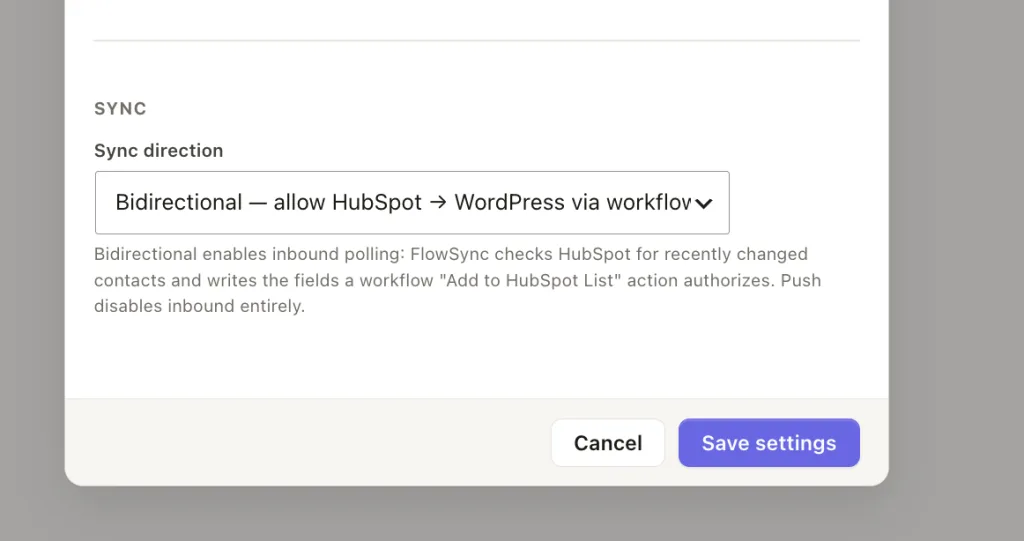
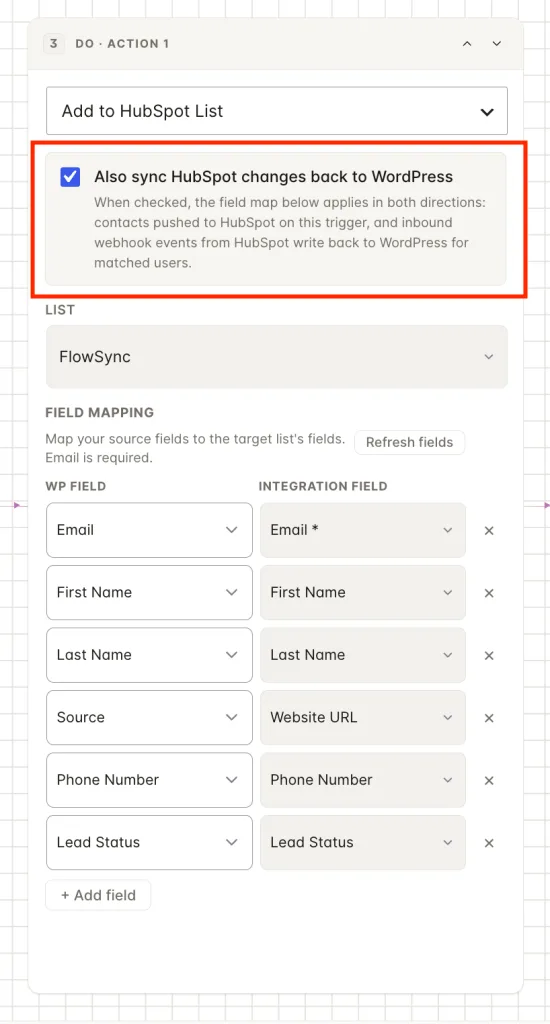
FlowSync does not automatically write back every property. The contract is explicit. On your Add to HubSpot List action, enable inbound sync and map the HubSpot properties you want pulled back to their WordPress fields. Only the fields you map there are eligible for writing, and FlowSync updates only users that already exist in WordPress. A HubSpot contact without a matching WordPress account is skipped, so inbound sync never creates new WordPress users.
For developers: HubSpot inbound is poll-driven, not webhook-driven. FlowSync queries HubSpot’s contacts search by
lastmodifieddateagainst a stored cursor, requesting only the properties your inbound-enabled actions map. Writes go through the same sync service as every other inbound provider and acquire a per-fieldSync_Lockbefore writing, so a write-back can’t bounce out and re-trigger the outbound sync.
If you don’t need data flowing back, leave Sync direction on Push, and the workflow stays one direction.
Step 7: Activate and verify
Toggle the workflow to Active. New activations will now sync as they happen.
To catch up your existing members, use Run manually from the workflow’s menu (a Pro feature). The manual run has a dry run option that reports how many users are eligible, how many would be skipped, and a sample of the first five, without sending anything to HubSpot. Use that to confirm the condition is catching the right members before you run it for real. Manual runs only work on active workflows, so activate first, then preview.
After a real run, open FlowSync → Logs to see each contact that synced and the result. That’s where you’ll confirm what actually went to HubSpot, rather than guessing from the workflow config.
Common issues
A contact already exists in HubSpot. That’s expected and fine. FlowSync matches by email and updates the existing contact instead of creating a new one, so re-running the workflow won’t produce duplicates.
Mapped fields show up empty in HubSpot. FlowSync only sends fields that have a value, so an empty WordPress field won’t overwrite existing HubSpot data. If a field is blank in HubSpot after a sync, check that the WordPress user profile actually has that value filled in.
Changes in HubSpot aren’t appearing in WordPress. Confirm three things: Sync direction is set to Bidirectional on the HubSpot integration, inbound sync is enabled on the Add to HubSpot List action with the field mapped, and the HubSpot contact’s email matches an existing WordPress user. All three have to be true for a write-back to happen.
Next steps
Clone this workflow for each membership product. Change the Membership Product condition and the HubSpot list for each copy, so free members go into a nurture list while paid members go straight to a sales follow-up list. If you run bidirectional sync, decide per workflow which HubSpot properties are allowed to write back, so a member’s WordPress profile only ever reflects the fields you actually want managed from the CRM.
You can also Sync WordPress users to Klaviyo immediately after registration.

FlowSync
FlowSync syncs members, customers, and form leads to Brevo, Mailchimp, HubSpot, Klaviyo, and more based on activity happening on your WordPress site.