If you run a membership site, a WooCommerce store, or a lead-generation site on WordPress, one of the first things that quietly breaks as you grow is the gap between what happens on your site and what your email list actually knows about it.
Someone registers and never makes it into Brevo; a customer buys a product, and the onboarding sequence you carefully built never starts; a member lets their subscription lapse and keeps sitting on your active list, receiving emails meant for paying customers. None of these are dramatic failures, which is exactly why they slip past you until the list is already a mess and you’re not sure which contacts are real anymore.
Most site owners patch this by hand at first, exporting CSV files every week, copying email addresses between two browser tabs, or leaning on whatever limited integration their form plugin happens to ship with, and that holds together fine right up until the site starts getting enough registrations and orders that nobody has time to keep doing it manually. That’s the point where you need the sync to run on its own.
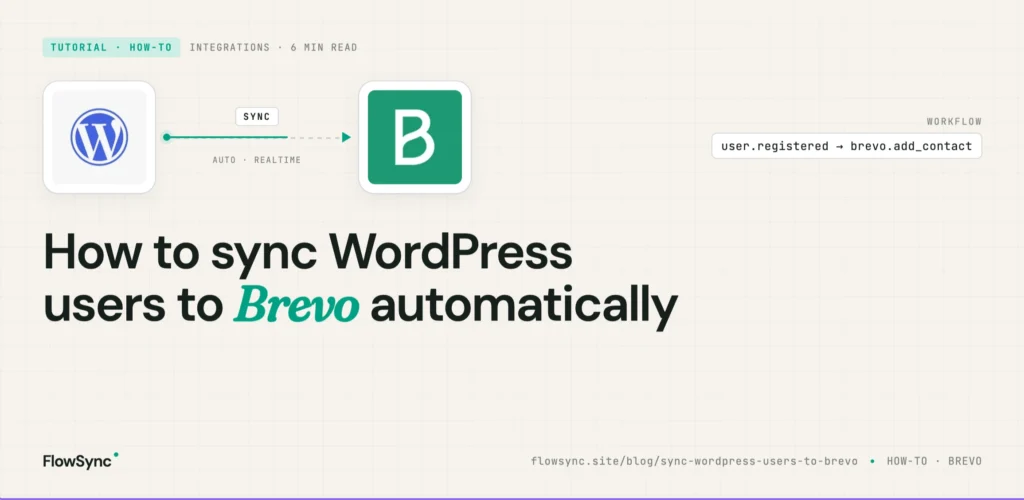
This guide walks through how to sync WordPress users to Brevo automatically with FlowSync, so that when something happens on your site, the right contact lands in the right Brevo list without you touching a spreadsheet. By the end, you’ll know how to connect WordPress to Brevo, sync users automatically when events fire on your site, segment people into separate lists, and build the whole thing through the FlowSync interface without writing any code.
FlowSync is a WordPress plugin built specifically for this kind of CRM and email syncing, which means that instead of asking you to export contacts on a schedule, it watches for events happening on your site and pushes the right people into Brevo as those events occur.
Why syncing users by hand stops working
Picture a membership site running on MemberPress. A new member signs up for your Gold plan, and now you have a short list of things that all need to happen: they should be added to Brevo, dropped into the right welcome sequence, tagged so your segments stay accurate, and eventually removed if their membership expires. Done by hand, every one of those steps is a small chance of forgetting someone, emailing the wrong audience, or letting your CRM fill up with expired members tangled among the active ones until nobody trusts the segments.
Automation solves this by wiring WordPress events straight to your CRM, so the work that used to be a weekly export job just runs in the background the moment each event fires.
What you can automate between WordPress and Brevo
FlowSync is focused on WordPress-to-CRM syncing and audience automation, and the Brevo workflows people set up most often look like this: adding new WordPress users to a Brevo list, syncing WooCommerce customers as they buy, dropping ProfilePress members into plan-specific lists, removing expired members so they stop getting active-customer email, segmenting buyers by what they purchased, and pushing form leads into the right list as they come in.
Every workflow is built from the same three pieces, which is what keeps the setup easy to reason about and easy to debug later when you’re trying to work out why a particular contact did or didn’t sync:
- A trigger is the event on your site that starts the workflow
- A condition, an optional filter that decides which users the workflow actually applies to
- An action, the thing FlowSync does in response, such as adding the contact to a Brevo list
So a complete workflow reads as plainly as a sentence: when a user registers (trigger), if their role is Customer (condition), add them to a Brevo list (action).
Step 1: Install FlowSync
Install and activate the FlowSync plugin on your WordPress site, then open the FlowSync dashboard from your WordPress admin menu. You’ll see sections for Workflows, Integrations, Logs, and Settings, which are the four areas you’ll move between as you build and check your syncs.
For developers: FlowSync schedules every workflow that includes an external CRM action through Action Scheduler rather than running it inline, so a slow or unreachable Brevo API never blocks the
user_registerrequest that triggered it. If Action Scheduler isn’t available on the site, the activator surfaces an admin notice and switch to WP Cron rather than failing silently.
Step 2: Connect Brevo to WordPress
Go to FlowSync → Integrations, find Brevo in the list, and click Configure. Brevo authenticates with an API key, so you’ll need to grab one from your Brevo account first: log into the Brevo dashboard, open SMTP & API, go to the API Keys section, generate a new key, and copy it. Paste that key into the FlowSync configure screen and save. Once it’s saved, FlowSync can read your Brevo lists and automatically push contacts into them, so the list dropdowns you’ll use in the next step are populated from your real Brevo account rather than something you have to type in by hand.
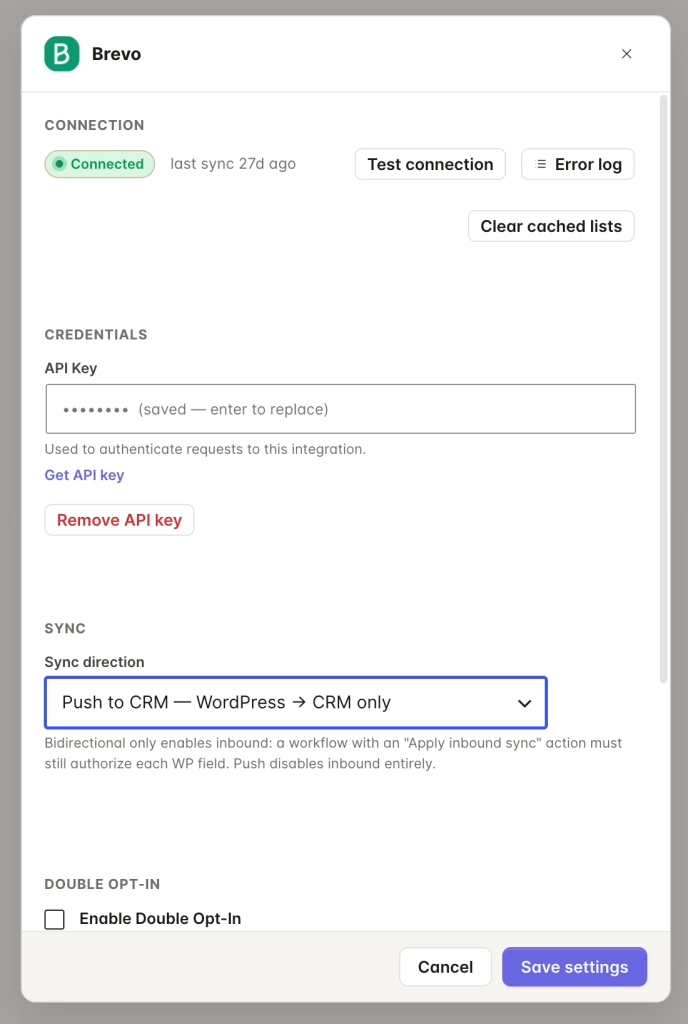
For developers: The key is stored against the Brevo integration and the list/field data it fetches is cached for about ten minutes through FlowSync’s integration cache, so you won’t hammer the Brevo API on every page load. Changing the API key flushes that cache immediately, and the “Test connection” button always does a live round trip so you can confirm the credentials before relying on them.
Step 3: Build your first workflow
Now build a simple automation that adds every new WordPress user to a Brevo list. Go to FlowSync → Workflows → Add New and work through the three pieces in order.
Choose a trigger
Pick “User Registered” as the trigger, which runs the workflow whenever a new account is created on your site. This is the most common starting point because it catches everyone who signs up, regardless of whether they came through a membership plan, a checkout, or a plain registration form.
Add a condition (optional)
Conditions let you narrow down who actually gets synced, so instead of sending every single registration to Brevo, you can limit the workflow to users with the Customer role, members on a specific plan, or people who came through WooCommerce as buyers. If you genuinely want every new user in Brevo, you can leave the condition out and the workflow will apply to all of them.
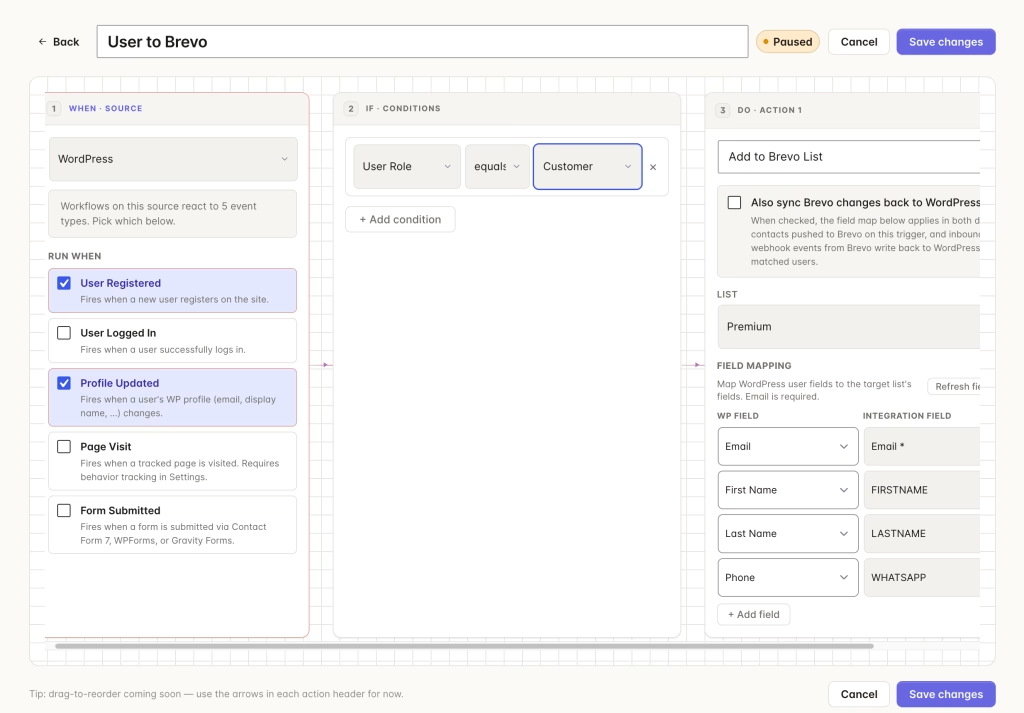
For developers: Condition fields come from the source that fired the trigger, so a ProfilePress subscription event exposes the plan, while a WooCommerce order event exposes order-level fields like total and product category. Advanced multi-field conditions are a Pro feature; the role and plan filters above work on the free plan.
Add the Brevo action
Add an action and choose Add to List, then pick the Brevo list you want new users to land in. From here you can map the contact fields that get sent across, and on the free plan that means email, first name, and last name, which covers the basics most lists need. Mapping anything richer, like custom Brevo attributes, order data, or membership details, is part of Pro’s advanced field mapping.
Save the workflow and switch it on. From that point forward, every new WordPress user is added to your Brevo list automatically, with no export and no manual step in between.
A real membership site example
Here’s a setup that’s common on membership sites and shows why you usually want more than one workflow. A site owner selling premium courses through ProfilePress wants new paying members added to Brevo, trial users kept in a separate list, and expired members automatically removed so they stop receiving member-only emails. That’s three distinct behaviours, so it’s three workflows rather than one complicated one, which keeps each piece easy to read and easy to switch off independently if you need to.
The first workflow handles active members: the trigger is Subscription Created, the condition is plan equals Gold Membership, and the action adds the user to your “Gold Members” list in Brevo. The second handles the other end of the lifecycle: the trigger is Subscription Expired, and the action removes the user from the “Gold Members” list. Between the two, your Gold Members list stays accurate on its own, without you exporting anything, opening a spreadsheet, or scrubbing the list by hand at the end of every month.
For developers: Removal actions are non-destructive by default, which means an expired member is unlinked from the target list rather than deleted from Brevo entirely. FlowSync doesn’t own your full CRM membership state, so it avoids destructive reversals that could wipe out a contact who belongs to other lists for other reasons.
A WooCommerce example
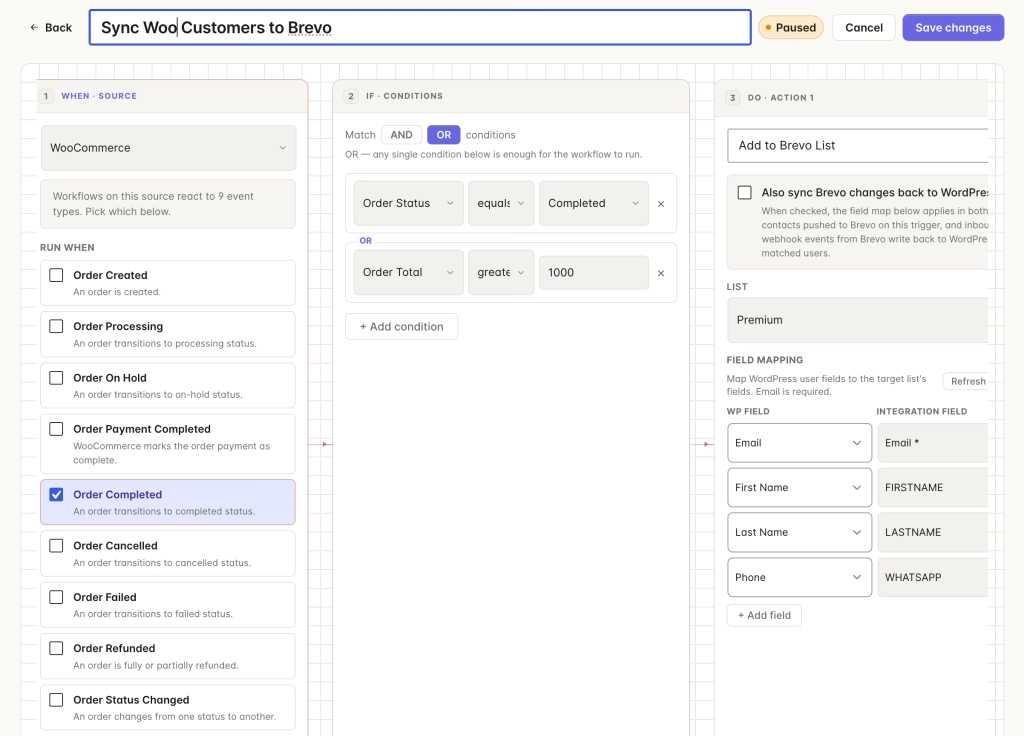
The same pattern works for WooCommerce customers. Set the trigger to Order Completed, add a condition like product category equals Electronics, and use the Add to List action to drop those buyers into an “Electronics Buyers” list in Brevo. Once that’s running, your post-purchase follow-up, cross-sell campaigns, and customer segments all stay populated automatically as orders come in, rather than relying on someone to update the list after each sale.
Mistakes worth avoiding
The most common one is dumping every contact into a single giant list, which feels simpler at first and turns into a problem the moment you want to send anything targeted, because you can no longer tell a trial user apart from a lapsed member apart from a repeat buyer. It’s far easier to segment as people sync, splitting them by membership status, purchased products, user role, which form they submitted, or where they are in the subscription lifecycle, since good segmentation is what makes the campaigns you send later actually relevant.
The second one is treating the sync as a one-way street that only ever adds people. Adding contacts is only half the job, and without cleanup workflows, your lists slowly fill with canceled members and expired subscribers, so it’s worth building the remove-from-list workflows at the same time you build the add ones, and moving genuinely inactive users into a re-engagement list rather than leaving them to quietly drag down your open rates.
The third one is going live without testing. Before you trust a workflow, create a test user, run it through, and confirm the contact actually shows up in Brevo, that it landed in the correct list, that the fields you mapped came across, and that you haven’t accidentally created duplicates. Two minutes of testing saves you from discovering a broken sync three weeks and four hundred contacts later.
Why running the sync inside WordPress matters
You can wire WordPress up to Brevo through an external automation service like Zapier or Make, and it works, but it adds a moving part that sits between your site and your CRM and gives you one more thing that can fail, expire, or silently stop firing. When the sync runs inside WordPress instead, the workflows live alongside the site they’re reacting to, your membership and ecommerce plugins are understood directly rather than flattened into generic webhook payloads, and your contact data goes from the site straight to Brevo without a third-party relay in the middle. That last difference is the real one: an external tool sees a WooCommerce order as a blob of fields, whereas FlowSync knows what a subscription plan is, what a membership lifecycle event means, and which user role a buyer holds, because it was built around those WordPress concepts rather than bolted on top of them.
FAQ
Can I sync existing WordPress users to Brevo?
Yes. FlowSync’s manual run lets you process the users already on your site in batches and send them to Brevo, which is how you backfill an existing membership base or customer list when you first connect Brevo, rather than only catching people from the moment you switch the workflow on. Manual bulk runs are a Pro feature.
Does this work with WooCommerce?
Yes. WooCommerce order events are supported, so you can build order-based workflows and segment customers by what they bought.
Can I remove users from Brevo automatically?
Yes. You can build workflows that remove a contact from a list when a membership expires, a subscription is cancelled, or a user goes inactive, and the removal is non-destructive by default so the contact is unlinked from that list rather than deleted outright.
Does this require coding?
No. Workflows are built entirely through the FlowSync interface inside your WordPress admin. The developer notes in this guide are there for anyone who wants to know what’s happening underneath, not steps you have to follow.
Can I filter users before they sync?
Yes. Conditions let you filter by membership plan, user role, purchased products, and other fields before a contact is sent to Brevo, so you only sync the people a given workflow is meant for.
Getting started
Keeping a CRM accurate by hand doesn’t scale, and the more registrations, orders, and memberships your site handles, the sooner that becomes obvious. The principle behind all of this is simple: when something important happens on your WordPress site, your Brevo lists should react to it on their own, and that’s exactly what FlowSync is built to do. Install the free version, connect Brevo, and build your first workflow in a few minutes. The free plan includes three workflows and syncs email, first name, and last name, which is enough to get a real sync running before you decide whether you need Pro’s field mapping and manual runs.

FlowSync
FlowSync syncs members, customers, and form leads to Brevo, Mailchimp, HubSpot, Klaviyo, and more based on activity happening on your WordPress site.